
Stone, Tile & Grout Cleaning & Sealing Process
Step 1 – Visual inspection: We will join you in the inspection to be sure that there are no damaged tile or grout areas. If the grout has not been properly installed there may be some problems. Some common installation mistakes include to much mix water, not enough cure time, improper trowel procedure or leaving small air pockets under the surface of the grout. Some preexisting conditions may worsen during the cleaning process. We can not be responsible for these damages.
We will inspect your tile & grout for the following:
- Chipped, broken, scratched, cracked or missing tiles
- Lippage
- Efflorescence
- Etching
- Missing, loose or crumbled grout
- Colored or uneven grout color
- Type of grout: Sanded, Unsanded, Epoxy
- Excessive soiling
- Pre-existing baseboard damage
- Type of Tile or Stone and if it is acid sensitive.
Step 2 – Furniture Moving: Furniture on tile and grout areas should be moved to carpeted areas. We can move large pieces such as a dining room table within the room while cleaning if it can not be removed from the room. Some items such as a loaded china cabinet can be cleaned around.
Step 3 – Pre-treat: We apply a mild alkaline solution to the tile & grout and allow dwell time. This pre-treatment loosens accumulated soil, grease, and contaminants, and prepares the surface for our cleaning process.
Step 4 – Agitation: Using a grout brush we agitate the prespray in the grout lines and edges along walls.
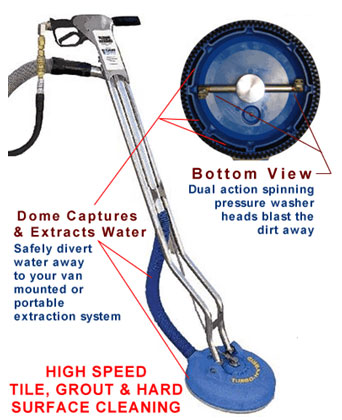 Step 5 – Cleaning: Next we rinse the tile and grout with hot water and extract the cleaning solution, dirt and contaminants from the pores of the tile and grout. Our truck mount generates water pressure up to 1,000 P.S.I. and water temperature over 200 degrees. The floor tool connects to a powerful vacuum hose, which sucks the cleaning disk to the floor, and confines the water spray inside the 16-inch disk. There is virtually no splash over to worry about. The vacuum hose draws away the water, along with the dirt, to a containment tank on our truck. The combination of cleaning solution, agitation, heat, water pressure, and suction removes most stains and soil. Some stains, (red wine, mustard, dyes, etc.) will not come out because they dye the grout. Some grout requires an acid rinse to remove any staining that did not come out with the alkaline cleaning agent.
Step 6 – Drying: After cleaning is complete air movers are used to assist drying the floors.
Step 7 – Grout Sealing: After cleaning we can seal your grout to help prevent resoiling and increase the longevity of the grout. Grout’s high degree of porosity allows fluids and dirt to be absorbed, resulting in stained or dingy looking grout. Applying a sealer will help fill the pore structure and help keep the grout from absorbing stains and foreign materials. The sealer does not change the appearance of the floors by adding a shine or luster. Instead, it preserves the natural beauty of the surface. Click here to learn more about grout sealing